Understanding Event Propagation in JavaScript: Bubbling vs. Capturing Explained
Introduction
Event handling is a fundamental aspect of web development, empowering developers to create interactive and dynamic user experiences. In JavaScript, events propagate through the Document Object Model (DOM), triggering callbacks and executing functionality. Understanding event propagation is crucial for building robust applications. Two key mechanisms govern how events propagate: bubbling and capturing.
What is Event Propagation?
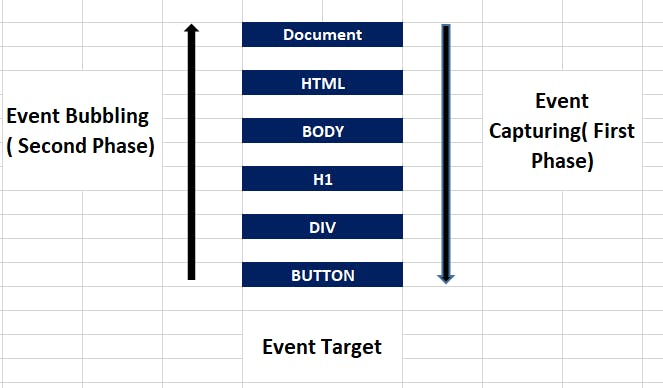
Event propagation refers to the mechanism by which events travel through the DOM hierarchy, from the target element to its ancestors or descendants. When an event occurs on an element, it can propagate through various phases, allowing parent or child elements to respond accordingly.
Bubbling vs. Capturing
Bubbling
Bubbling is the default behaviour of event propagation in most modern browsers. When an event is triggered on a particular element, such as a button, the event first fires on the target element itself. Then, it propagates upward through the DOM hierarchy, triggering the same event on each ancestor element.
Consider the following HTML structure:
<div id="outer">
  <div id="inner">
    <button id="btn">Click me</button>
  </div>
</div>
If a click event occurs on the button (#btn), the bubbling phase will propagate the event in the following order:
Button (
#btn)Inner div (
#inner)Outer div (
#outer)
Let's illustrate this with JavaScript:
document.getElementById('outer').addEventListener('click', () => {
  console.log('Outer div clicked');
});

document.getElementById('inner').addEventListener('click', () => {
  console.log('Inner div clicked');
});

document.getElementById('btn').addEventListener('click', () => {
  console.log('Button clicked');
});
If you click the button, you'll notice that the event bubbles up, triggering the click handlers on each ancestor element.
Capturing
Capturing, also known as trickling, is the opposite of bubbling. In the capturing phase, the event starts from the highest ancestor element and travels down the DOM hierarchy to the target element. However, capturing is less commonly used than bubbling.
To listen for events during the capturing phase, you can pass a third argument true to the addEventListener method, indicating that you want to capture the event.
document.getElementById('outer').addEventListener('click', () => {
  console.log('Outer div clicked');
}, true);

document.getElementById('inner').addEventListener('click', () => {
  console.log('Inner div clicked');
}, true);

document.getElementById('btn').addEventListener('click', () => {
  console.log('Button clicked');
}, true);
In this example, if you click the button, the capturing phase will occur in the following order:
Outer div (
#outer)Inner div (
#inner)Button (
#btn)

Event Propagation in Practice
Understanding event propagation is essential for writing efficient and maintainable code. Let's explore a practical scenario where event propagation plays a significant role:
Example: Nested Dropdown Menus
Consider a web application with nested dropdown menus. Each dropdown menu contains multiple items, and clicking on an item triggers an action. However, clicking outside the dropdown should close it.
<div class="dropdown">
  <button class="dropdown-toggle">Dropdown 1</button>
  <ul class="dropdown-menu">
    <li>Item 1</li>
    <li>Item 2</li>
  </ul>
</div>
<div class="dropdown">
  <button class="dropdown-toggle">Dropdown 2</button>
  <ul class="dropdown-menu">
    <li>Item 3</li>
    <li>Item 4</li>
  </ul>
</div>
To achieve this behavior, we can utilize event delegation and event propagation. We attach a click event listener to the document, and during the bubbling phase, we check if the clicked element is inside a dropdown menu. If not, we close all dropdowns.
document.addEventListener('click', (event) => {
  const dropdowns = document.querySelectorAll('.dropdown');
  dropdowns.forEach((dropdown) => {
    if (!dropdown.contains(event.target)) {
      dropdown.classList.remove('open');
    }
  });
});

document.querySelectorAll('.dropdown-toggle').forEach((toggle) => {
  toggle.addEventListener('click', (event) => {
    const dropdown = event.target.nextElementSibling;
    dropdown.classList.toggle('open');
  });
});
In this example, event propagation simplifies the management of dropdown menus, ensuring that only relevant dropdowns remain open when interacting with the document.
Conclusion
Understanding event propagation in JavaScript is essential for creating interactive and responsive web applications. Bubbling and capturing are two mechanisms that dictate how events traverse the DOM hierarchy. By leveraging these concepts effectively, developers can build more robust and maintainable codebases. Whether you're handling simple button clicks or managing complex UI interactions, mastering event propagation is a valuable skill for any web developer.
By delving into practical examples and exploring the nuances of bubbling versus capturing, you can deepen your understanding of event propagation and elevate your JavaScript proficiency.
Here are some references you can include to provide further reading and resources on event propagation in JavaScript:
Mozilla Developer Network (MDN) - Event propagation: MDN Web Docs - Event propagation
JavaScript.info - Bubbling and capturing: JavaScript.info - Bubbling and capturing
W3C DOM Level 3 Events Specification: W3C DOM Level 3 Events
Stack Overflow - Understanding event bubbling and capturing: Stack Overflow - Event bubbling and capturing
SitePoint - Event Propagation in JavaScript: SitePoint - Event Propagation in JavaScript
These references cover a range of topics from official specifications to practical explanations and community discussions, offering a comprehensive understanding of event propagation in JavaScript.